|
Many others use 5/8" or 1/2". |
LK-PremiumSauna heater and Control - Upgraded Sauna Craft CW-XR - 100% Stainless Steel Heater, Lifetime Residential Warranty. Cedar - Thickest 11/16" cedar used for walls and ceiling. (Many others use 5/8" or 1/2".) 2x4 Benches - LK Plus benches are constructed completely from thick 2x4 cedar. Bench tops, cleats, girths and center support legs (if required) are all 2x4 cedar for maximum strength and rigidity. Pre-Hung Door. Most popular door are the frameless glass door (bronze or clear) or cedar framed with large tempered, insulated glass window. There are several styles of door and glass available. The door is provided left or right hinged as selected. Backrest and Bench Skirt - built-in backrest on upper bench and skirting between top and bottom bench. Accessories - LK Plus kit includes 4litre (one gallon) Sauna bucket & dipper, thermometer, Cedar light shade. exterior door casing |
Don't see "your" sauna size here? Not a problem. Saunafin can build a custom sauna kit for virtually any size or shape of sauna.
Contact us to discuss or send a drawing of what you have in mind. There are a great many new designer features being incorporated in saunas; inspired by online designer showcase websites. We will help you balance function vs. fashion. We will advise on how best to utilize the space. And as importantly, we will tell you if we think your design is bad or unworkable.
Select a Tab Below for More Info
Kits: Plus vs. Floating vs. Premium
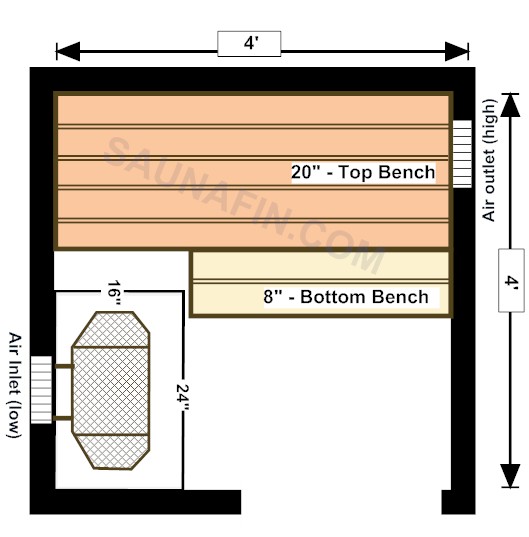
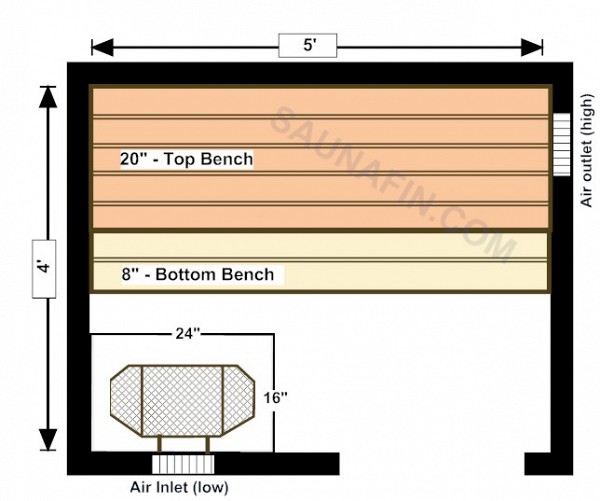
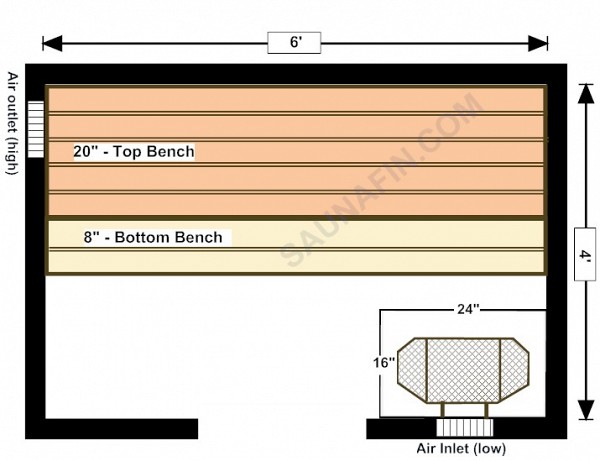
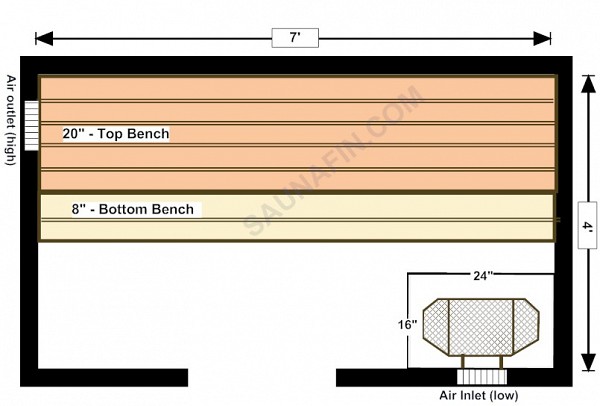
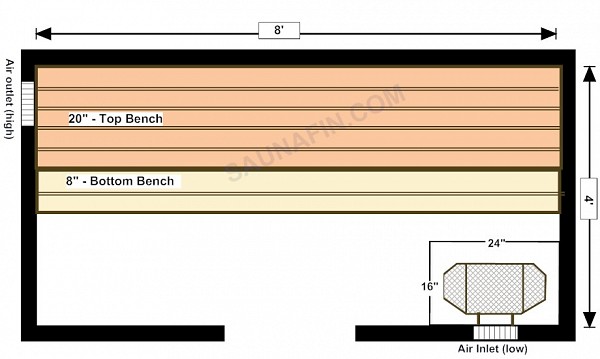
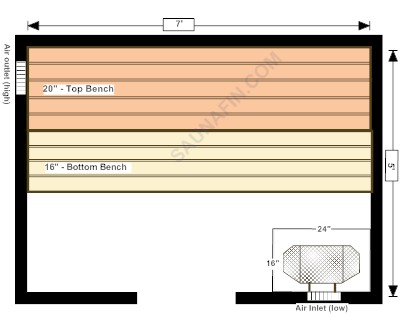
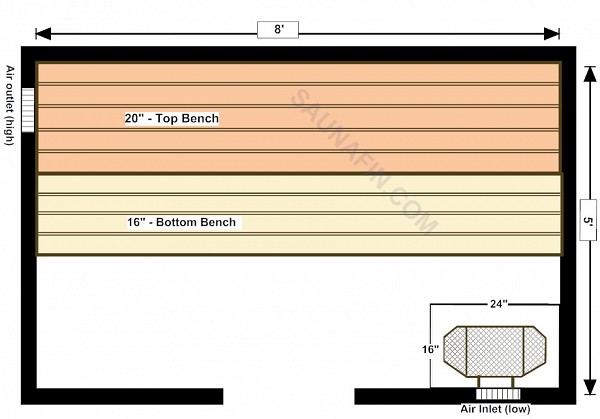
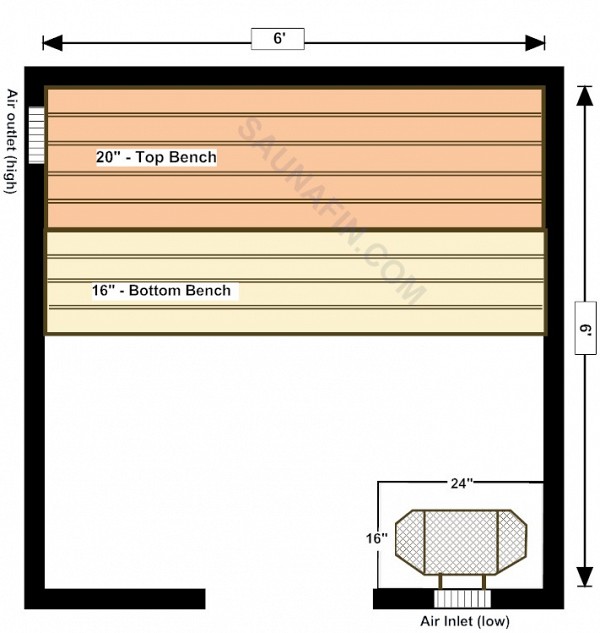
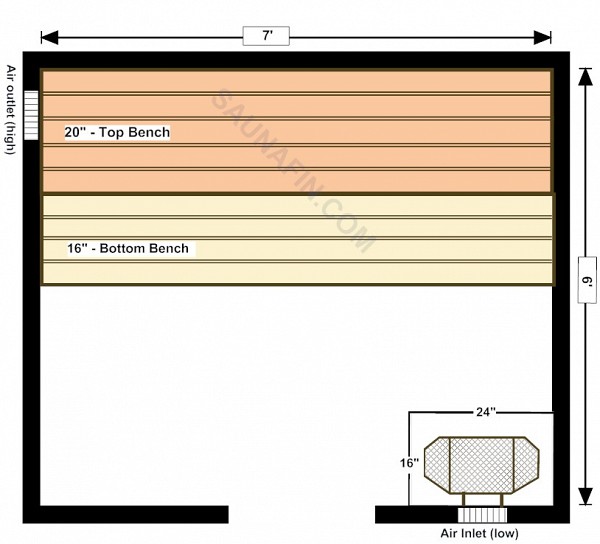
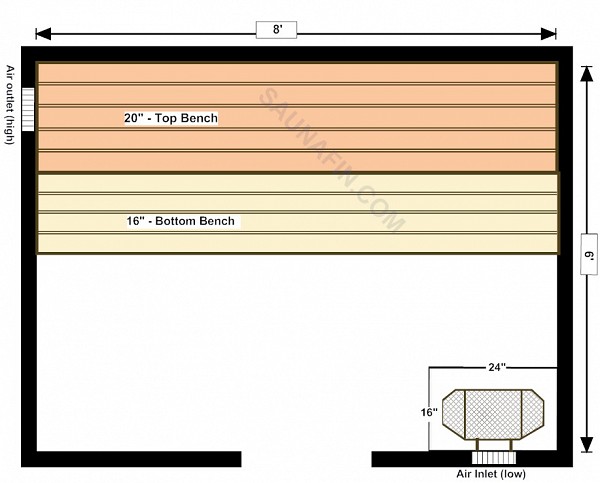
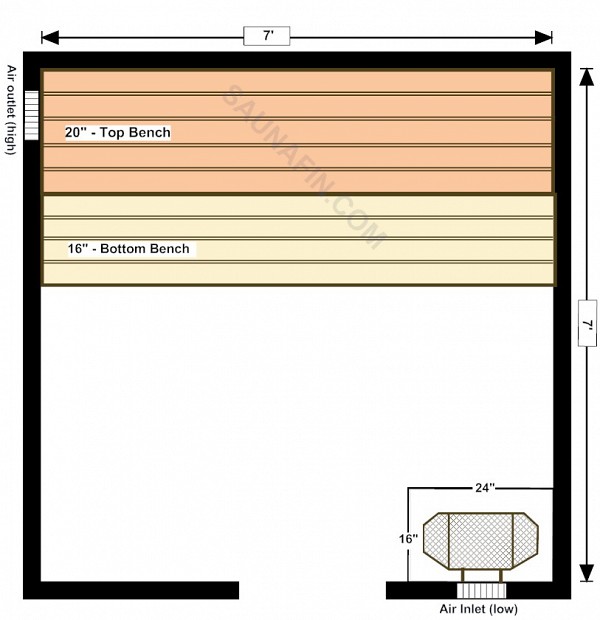
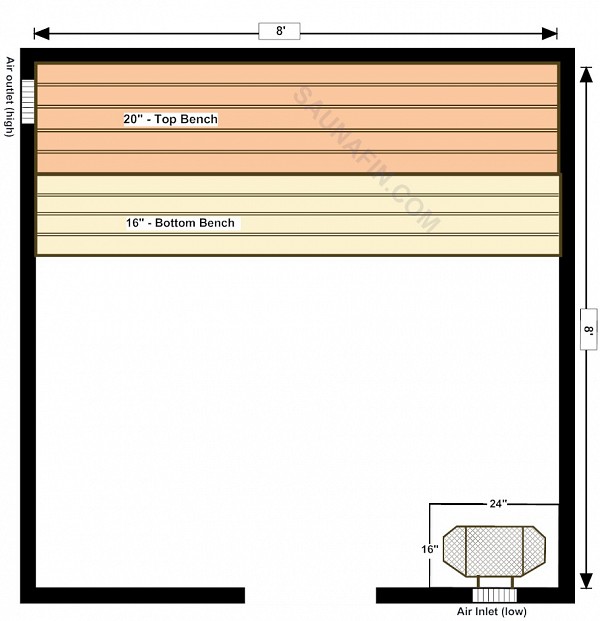
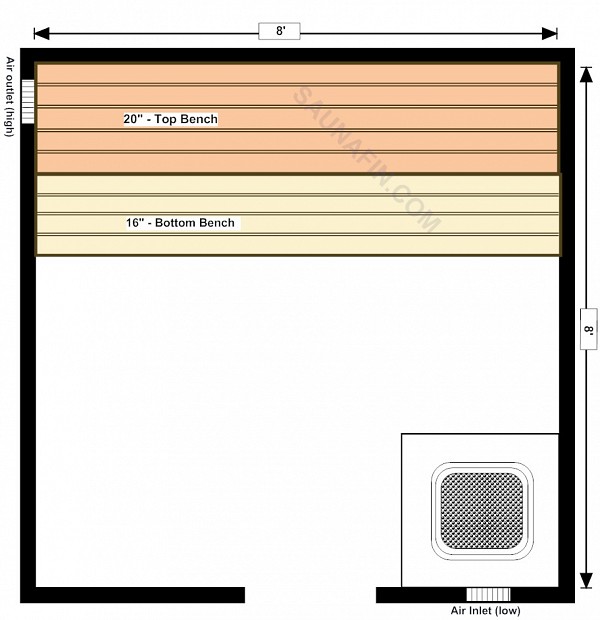
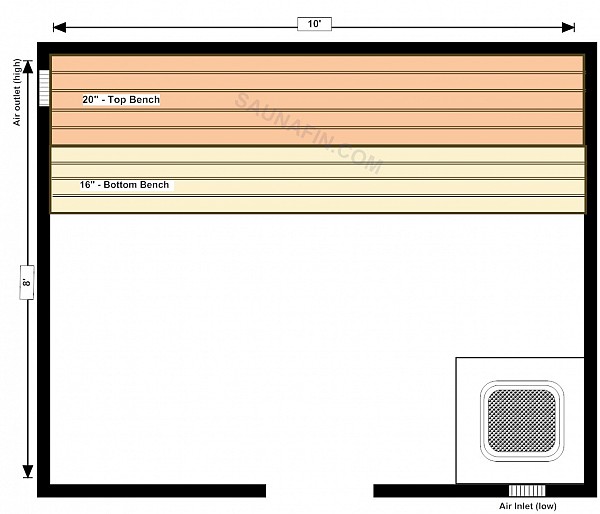
Common Sauna Layouts
Sauna Craft Features
Construction Manuals
Freight Estimate-Kits
Tylo Features
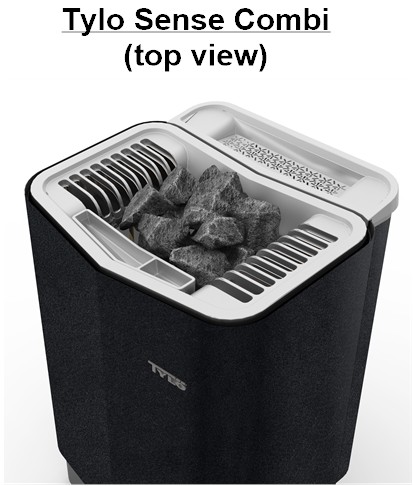
Combi Steaming Heater
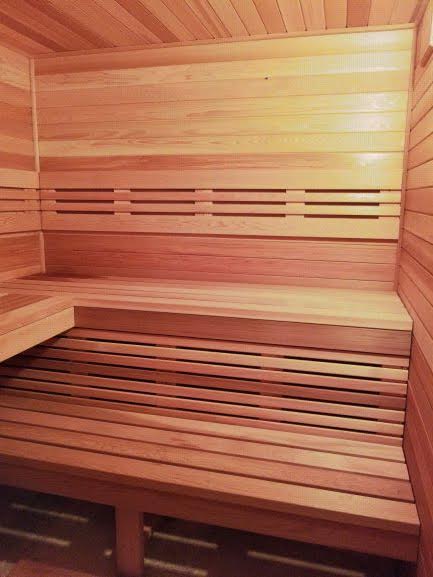
This is the most popular package. 11/16" Clear Western red cedar lining and strong, sturdy 2x4 bench tops and supports that are quicker to assemble and have a very substantial look and feel.
The LK Plus starts you off with a first-rate, high quality sauna and lets you pick and choose the options and extras that appeal to you.
(Note: Some pass off 5/8 cedar as 11/16. Ours is a true 11/16".)
Everything is the same as our LK Plus, except the benches. LK Plus has 2x4 bench tops with floor supports as required.
The Floating bench style uses 1x4 bench tops. The bottom bench is fully recessed under the top, and there are NO FLOOR SUPPORTS.
It is often selected when design has a frameless shower-style front wall. It is also is increasinglypopular for those who like a more modern, seemless look.
Starts as an LK Plus, but adds a lot of the most popular designer features and options at preferential prices.
LK Premium includes bench skirt, designer backrest, and Sauna Craft XR heater and EL-13 Electronic control.
It also includes accessory pack #1 (bucket, dipper, thermometer) light shade cover and exterior casing.
LK Premium is popular with customers who like all the included upgrades. The better price is a nice bonus.
On the other hand, it you like some of the other features, but not all, then you are usually better off selecting an LK Plus and adding the options upgrades you prefer.
Note: Some pass off 5/8 cedar as 11/16. All our lining material is a true 11/16".
| Overview |
LK-Plus
Sauna Craft CW-M w/ TPT3 Control |
LK-Floating Bench
|
LK-Premium
Sauna Craft CW-XR w/ EL-13 Control |
| Lining | "true" 11/16 Thickness (Clear) | "true" 11/16 Thickness (Clear) | "true" 11/16 Thickness (Clear) |
| Lining | Full Lengths(no seams up to 8') Horizontal Standard (up to 8'x8'). Vertical available as option Furniture grade sanded finish Kiln-dried to 9% |
||
|
Benches |
2x4 bench tops |
1x4 bench tops |
2x4 bench tops |
|
L-Bench |
Optional |
||
|
Backrest |
Optional |
Optional |
YES |
|
Bench Skirt |
Optiona |
N/A |
Top Bench Riser |
|
Door |
Frameless Tempered Glass Door has long Designer handle. Cedar framed doors with 16"x64" insulated tempered glass is optional. |
||
| All doors pre-hung to ease installation | |||
|
Heater |
Sauna Craft CW-M Model Other heater options |
Sauna Craft CW-M Model Other heater options |
Sauna Craft CW-XR Model |
|
Control |
Sauna Craft TPT3 |
Sauna Craft TPT3 |
Sauna Craft EL-13 Electronic Control |
| Floor Boards | Optional | ||
| Cedar Slide Vent | One slide vent | One slide vent | One slide vent, one fixed grill |
| Galvanized/Treated Fasteners | Yes | Yes | Yes |
| Foil | Yes | ||
| Light | Yes | ||
| Corner Molding | Yes | Yes | Yes |
| Cedar Casing | Inside | Inside | Two sides |
| Standard Accessories (Bucket, dipper, thermometer) |
Optional | Optional | Yes |
| Additional Accessories: (Sand timer, headrest, Eucalyptus, towel wrap) |
Optional | Optional | Light Shade |
 |
.jpg) |
(for saunas up to 450 cubic feet)
|
|
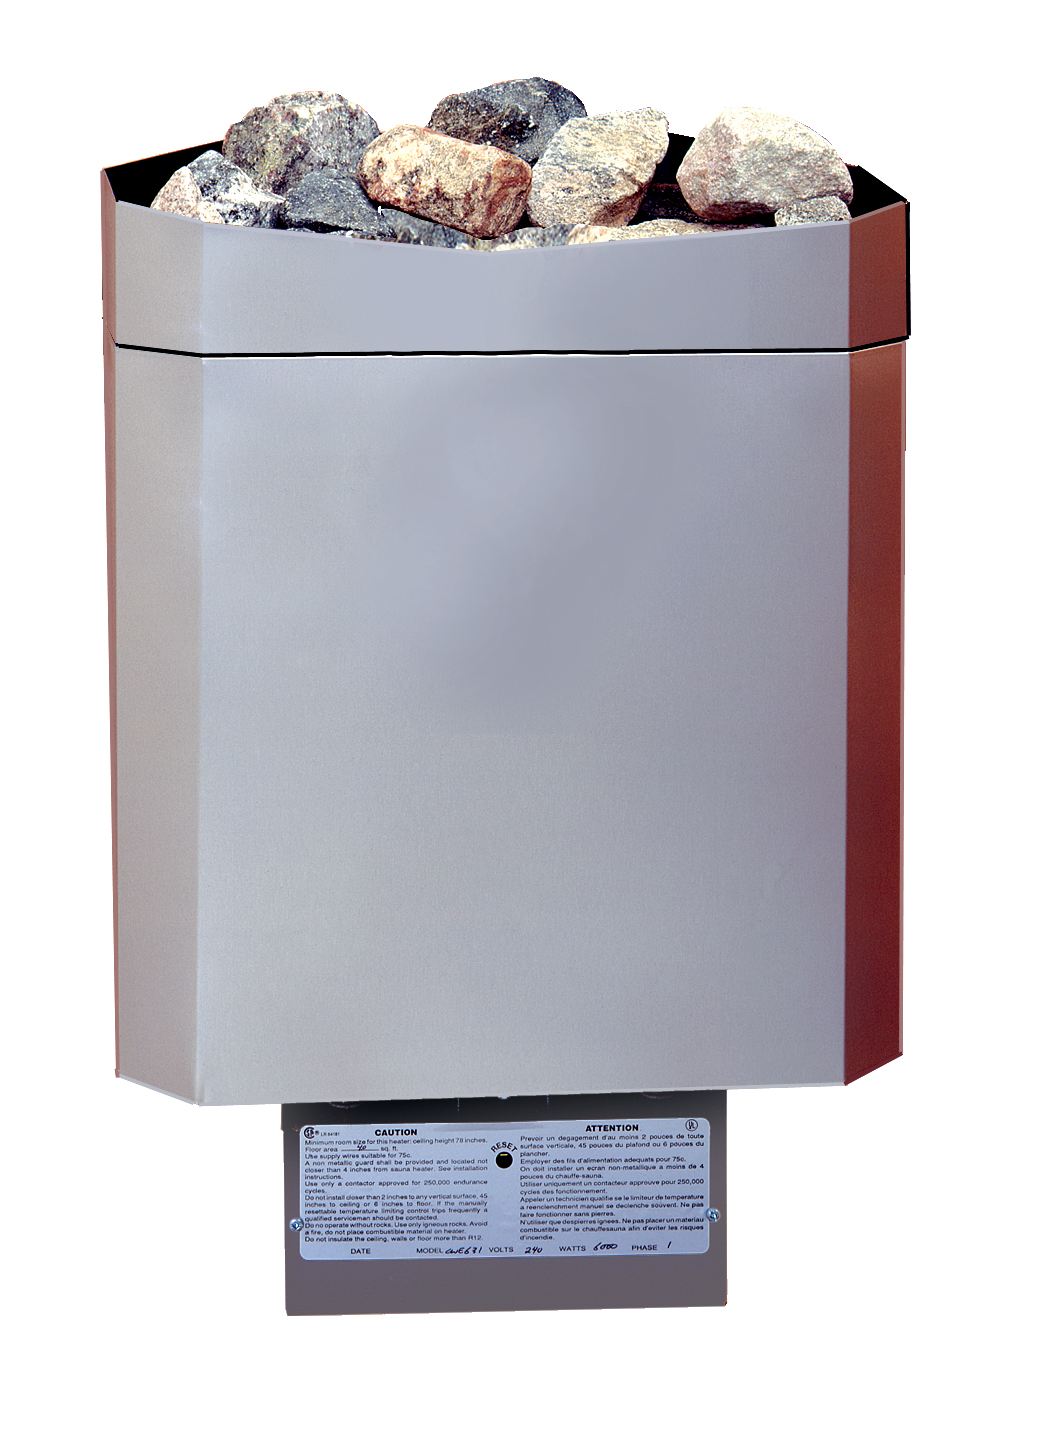
CWM: |
100% Stainless Steal. |
CW-XR: |
100% Stainless Steal. |
CWS/CWM: |
Residential Warranty: 5 years. |
Commercial Warranty: |
1 year |
CW-XR: Residential Warranty: |
Lifetime. |
Commercial Warranty: |
3 year |
.jpg) |
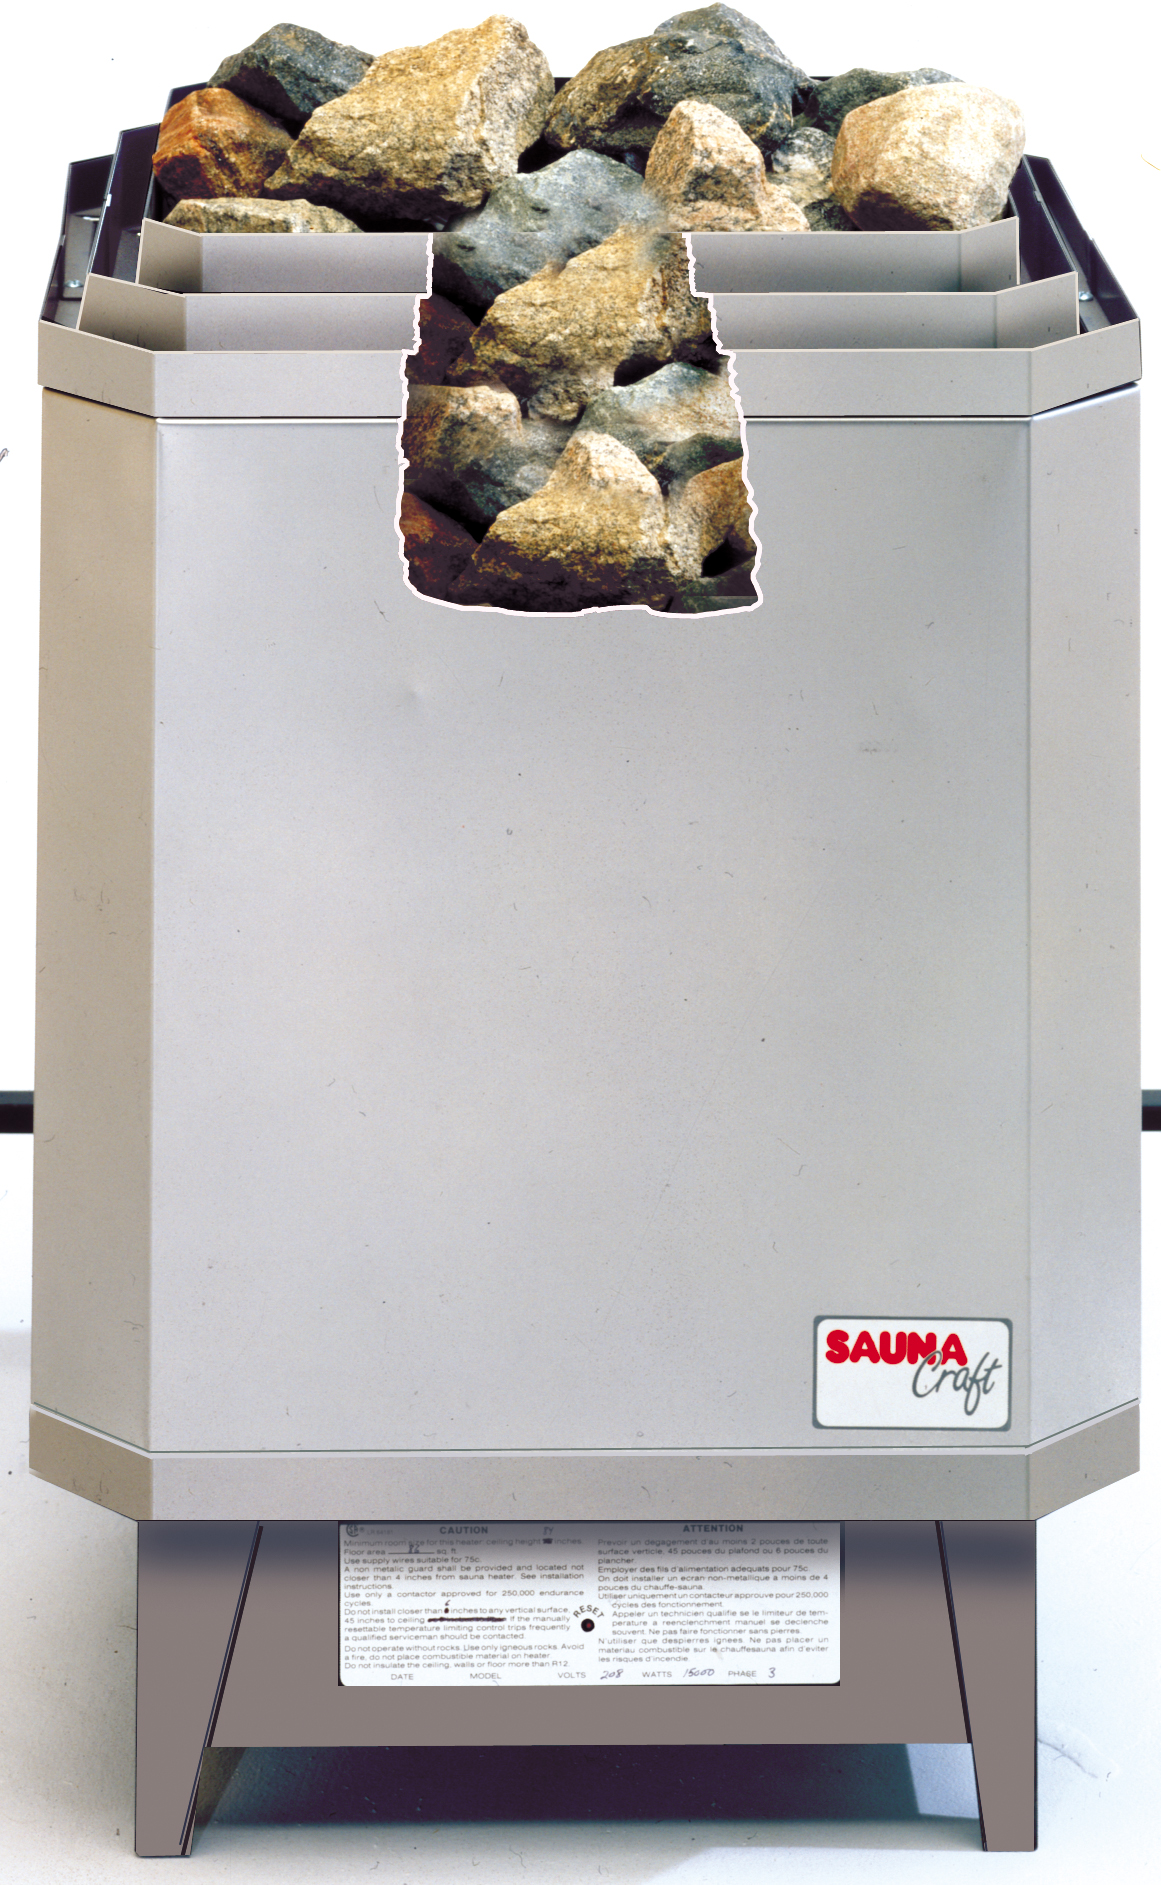 |
(for saunas over 450 cubic feet)
|
|
FM: |
100% Stainless Steal. |
FM-XR: |
100% Stainless Steal. |
CWS/CWM: |
Residential Warranty: 5 years. |
Commercial Warranty: |
1 year |
CW-XR: Residential Warranty: |
Lifetime. |
Commercial Warranty: |
3 year |

Note: Below are merely short form instructions for your consideration. The material kit will come with a full manual including detailed drawings.
Use 2 x 4 construction grade spruce studs to frame the walls and ceiling. If the ceiling span is over 10', use 2 x 6 studs. Unless otherwise specified, for saunas up to 8' x 8', the walls are LINED HORIZONTALLY and FRAMED VERTICALLY. Frame the walls at 16" on center. Frame or strap the ceiling to an inside height of 83-1/2". Frame the ceiling so that the cedar will run the shortest direction. Provide extra blocking for bench supports and heater.
Standard kit height 831/2". Most Saunas are 7' height or lower. Minimum height is generally 75" to 78" depending on heater model.
Maximum sauna height should never be higher than 8'. If you really want higher, we strongly urge being as close to 7' as you can, i.e. 7'-4" or 7'-6". (Extra cost for additional cedar.)
For standard horizontal lining, strapping is not required.
If lining vertically, strap (1 x 2 spf) over the foil to change direction. Can be used to create air space, but it is not necessary.
Electrical rough-in of heater, control and light should be done at this time. If using an outside control, the thermostat should be installed at this stage. (See heater specifications and control wiring diagrams for wire and breaker sizes.) Hook-up of the heater and light can be done after the sauna is completed.
The space between the studs in the walls and ceiling is filled with 3-1/2", R-12 fiberglass insulation.
Foil vapour barrier over the inside edge face of studs over the insulation.
Use the specified lengths of tongue and groove cedar (see "Material Packing List"). Depending on the actual inside finished size of your sauna, it may be necessary to trim these boards. Nail through the tongue only in order to conceal all nail heads (Blind nailing). Use the 11/2" nails supplied. Install the tongue and groove to the ceiling first. Start lining the walls at the floor and work your way up. The first board should be left about 1/2" off the floor. Cut the last board to fit.
Fasteners supplied are galvanized nails and treated deck screws. All fastening is to be blind nailed.
Depending on kit selected, there are clear 1 x 4 or 2 x 4 boards for bench top construction. Depending on the actual inside finished size of your sauna, it may be necessary to trim these boards. Before doing any fastening, select the boards to make sure the better face of the board comes out on the sitting surface. When building the benches, the better side will be face down as you are fastening from the bottom. This is so there are no nails or screws on the finished surface. Use the treated nails and screws supplied. If the sauna is 5' or more deep, the top bench is 20" deep and the bottom bench is 16" deep. If the sauna is 4' deep, the benches will be 20" & 8". Spacing between the bench boards should be about 9/16". (You can make gap smaller, but it will affect overall bench depth. You will have to adjust framing accordingly).
It is important to have two tier benches. the warmest air is closer ot ceiling. Sitting at a lower level, you will not feel the heat.
Door Rough Opening.
Standard: Frameless door Rough Opening: 27-1/2" x 76-1/2"
Optional: Cedar framed door style Rough Opening 26" x 76-1/2"
ROUGH OPENING: If unsure which door you want we recommend going with the wider. You can always reduce and trim later.
Frameless glass door has jamb on four sides. And comes with detachable spacer for bottom which has channel for back up ventilation
With spacer, rough opening will be 27-1/2" x 76-1/2"
Cedar framed door with 16" x 64" insulated glass or Solid cedar door with smaller 12"x24" insulated glass.
All doors are Pre-hung on jamb.
Frameless Glass Door = 24" x 72". With bottom spacer, Rough Opening=271/2 x 761/2".)
Cedar Door Style. Size = 24" x 74". Standard Rough opening=26" x 761/2".
Larger and custom doors available (i.e Tall Door=24"x78", Commercial Door=28"x78", Handicap Access=36"x78")
SAUNA DOORS SHOULD OPENS OUT.
Sauna Craft CW- model heaters can be mounted in the corner or on a straight wall.
Tylo (& Saaku) Sauna Heaters are designed to mount on the straight wall.
Use the 2 x 2 for the vertical posts and the 1 x 3 for the horizontal rails.
Use 1 x 4, square edge laid over 1x4 sleepers. Build as with benches with good face on walking surface. Top boards should be spaced approx. 5/8" apart. The sleepers should be placed at 1'-0" on center.
Commercial (public) saunas should have a drain in the center of the floor (sloped to the drain) to facilitate cleaning.
Most residential saunas have drains, but it is not essential. Water should only be used in moderation. (Our rule of thumb: If you are doing complete reno; i.e., breaking floors, new shower & bathroom, etc., we would suggest a sauna drain. If you are putting sauna in to an already finished area, it is likely not worth the cost to add a drain.
For residential, tile is attractive and functional; however, it is also acceptable to leave cement. If sauna is on upper level with wood sub-floor, there should be a rubber membrane, cement scratch coat and tile (like shower floor).
If floor is sloped to drain, mosaic tiles are best.
You may add a tile baseboard up the wall 2-3"
Most Kits are picked up at our factory. For all others please call for shipping rate.
Freight will be confirmed before the the order is finalized.
The U.S. freight table below is an estimate based your part of the country.
Sauna Kits are shipped via transport truck. Delivery is curbside (at the end of your driveway).
Lift gate delivery is included where available (for sizes up to 92")
| US FREIGHT ZONES | |||||
| Sauna Size | 4x4 to 5x6 | 4x7 to 5x7 | 6x7 to 6x8 | 7x7 to 8x8 | 8x8 (12Kw) to 8x10 |
| Zone 1 | $730.00 | $770.00 | $820.00 | $850.00 | $870.00 |
| Zone 2 | $740.00 | $780.00 | $840.00 | $870.00 | $880.00 |
| Zone 3 | $740.00 | $780.00 | $840.00 | $870.00 | $880.00 |
| Zone 4 | $820.00 | $880.00 | $940.00 | $1000.00 | $1030.00 |
| Zone 5 | $860.00 | $800.00 | $960.00 | $1000.00 | $1050.00 |
| Zone 6 | $840.00 | $900.00 | $960.00 | $1000.00 | $1050.00 |
| Zone 7 | $820.00 | $880.00 | $940.00 | $1000.00 | $1050.00 |
| Zone 8 | $900.00 | $950.00 | $1000.00 | $1050.00 | $1050.00 |
| Zone 9 | $1000.00 | $1050.00 | $1100.00 | $1200.00 | $1200.00 |
| Zone 10 | $1000.00 | $1050.00 | $1100.00 | $1200.00 | $1200.00 |
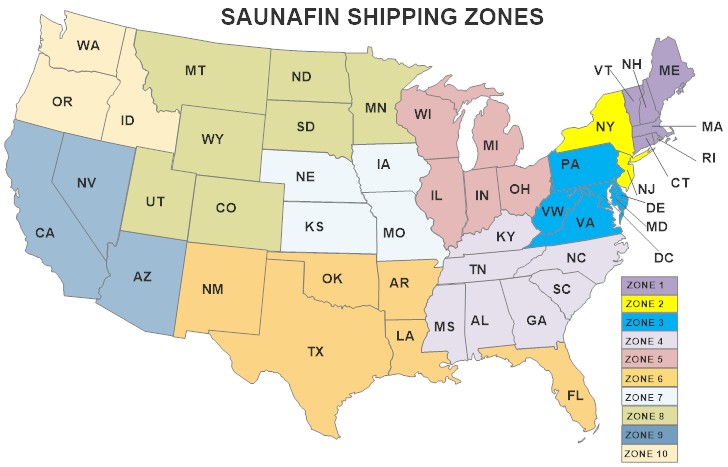
Freight surcharge may apply to remote or harder to reach zones (i.e. Mountain regions, FL keys, etc.)
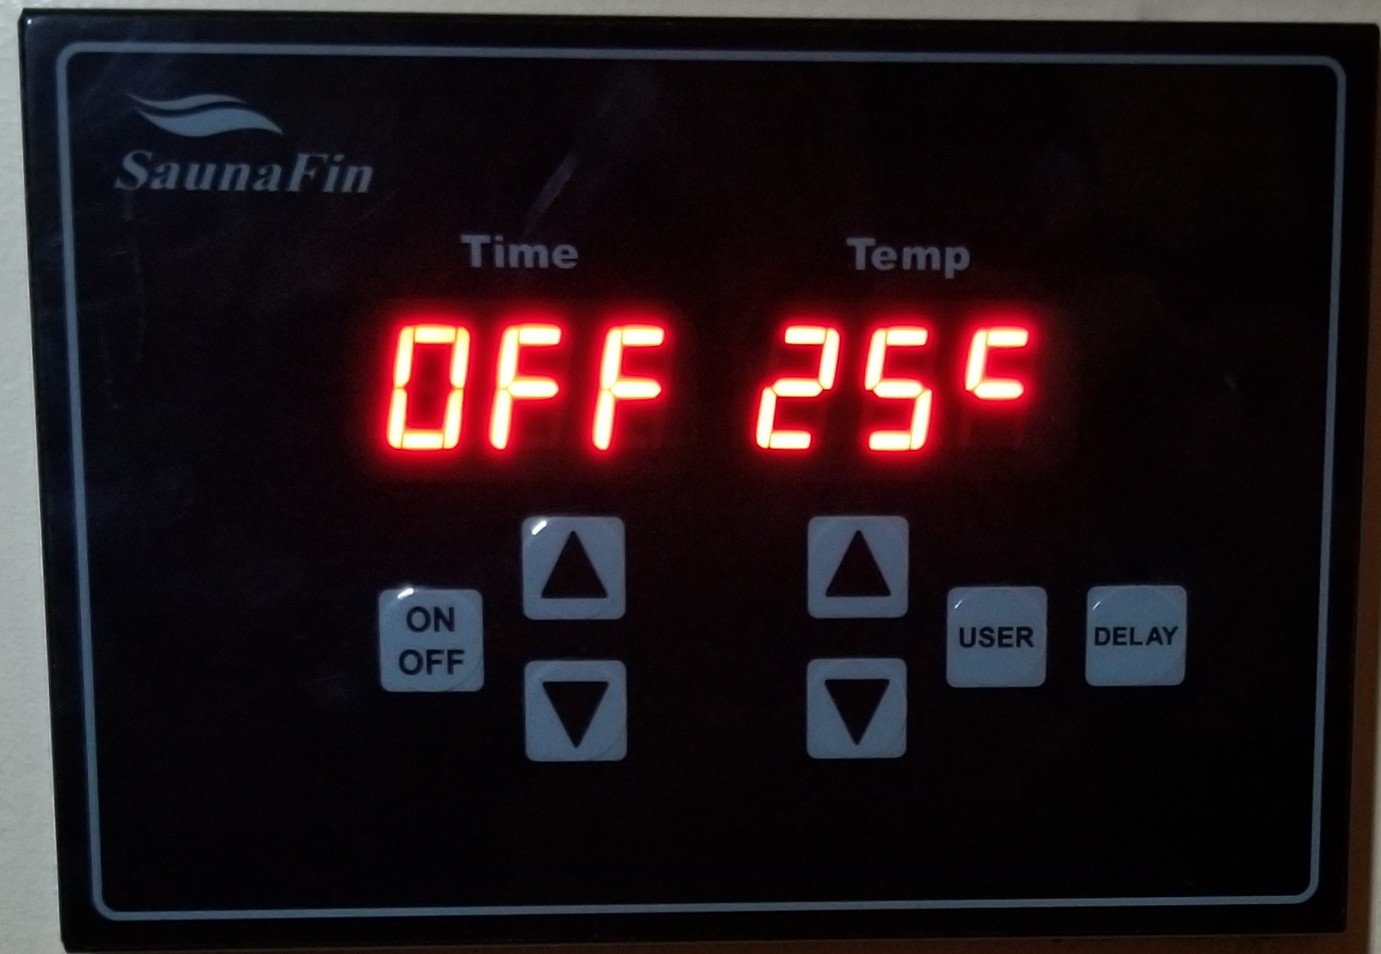
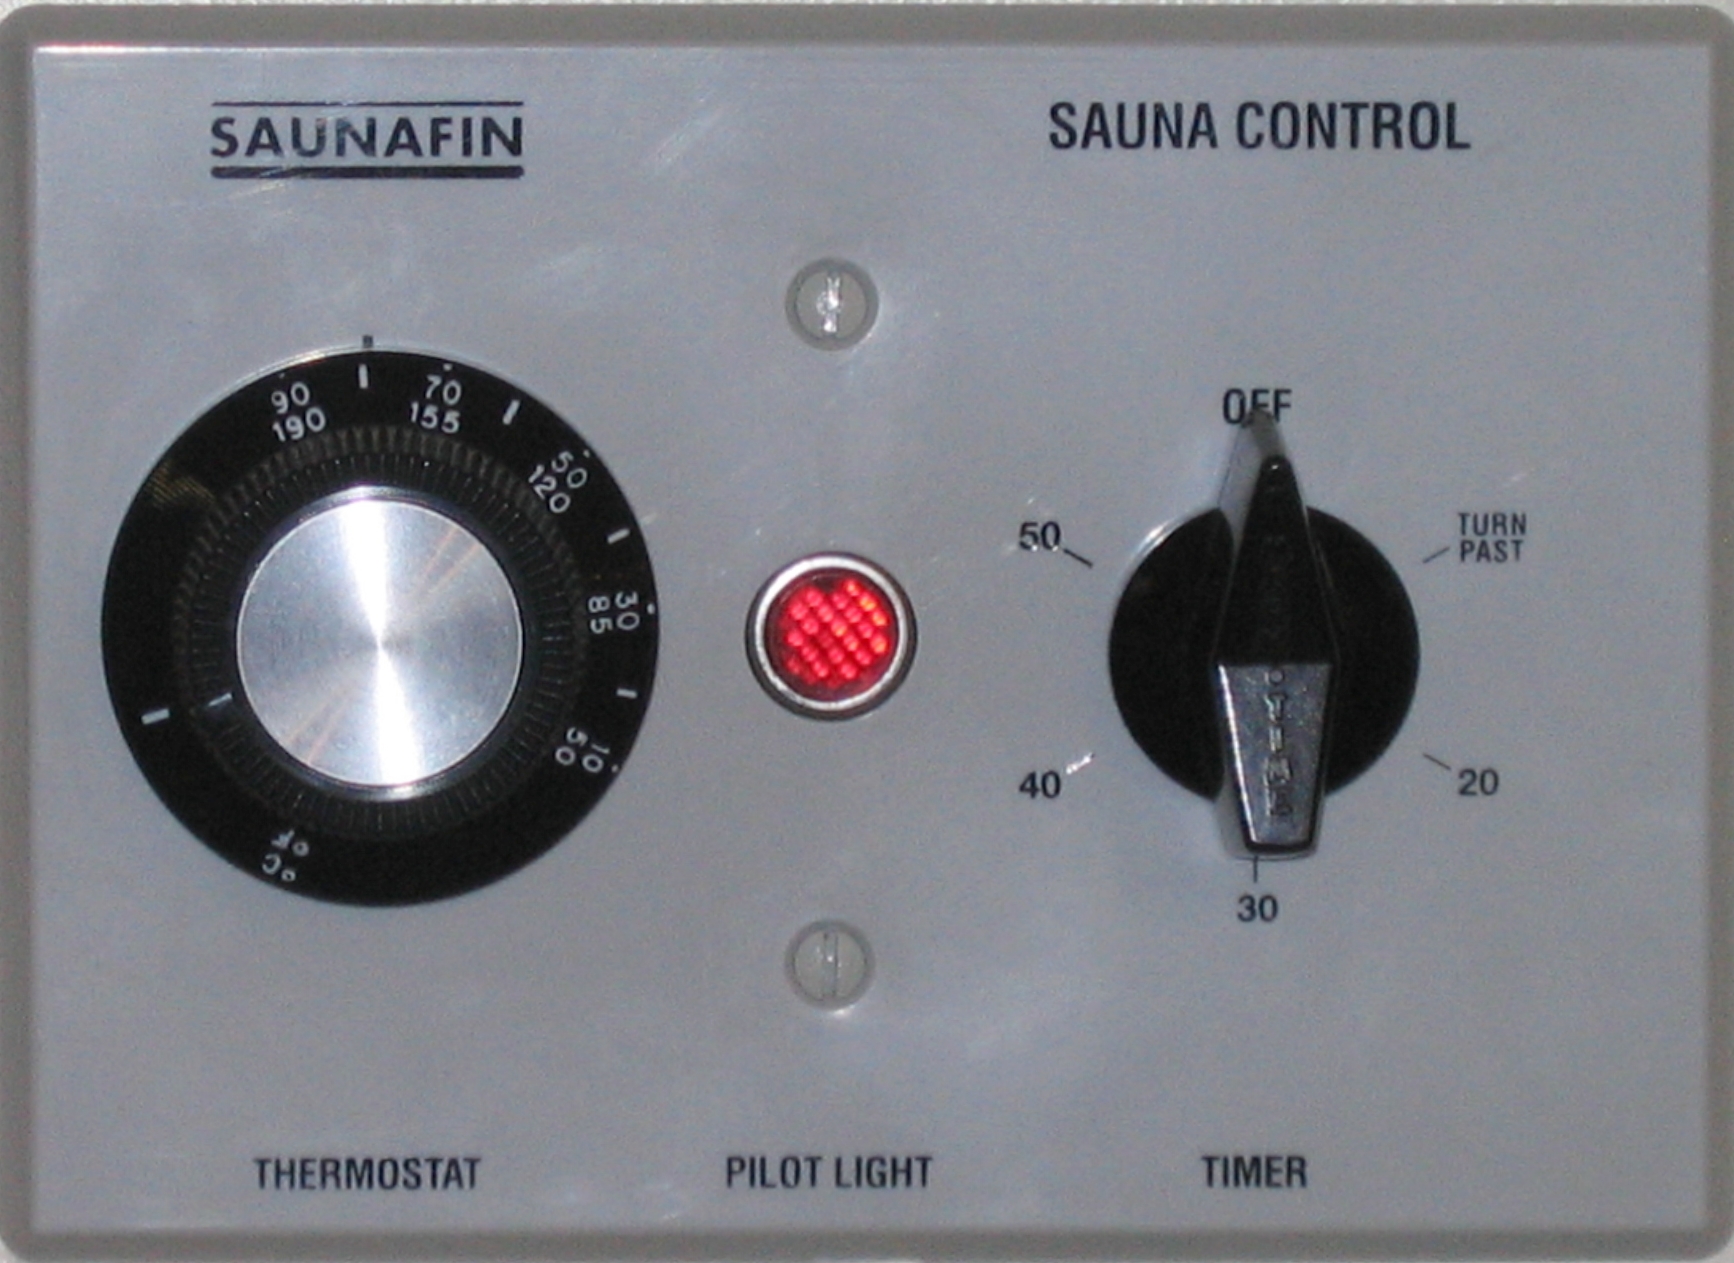
Mechanical Thermostat and Spring Timer at front/bottom of heater.
Separate steaming reservior.
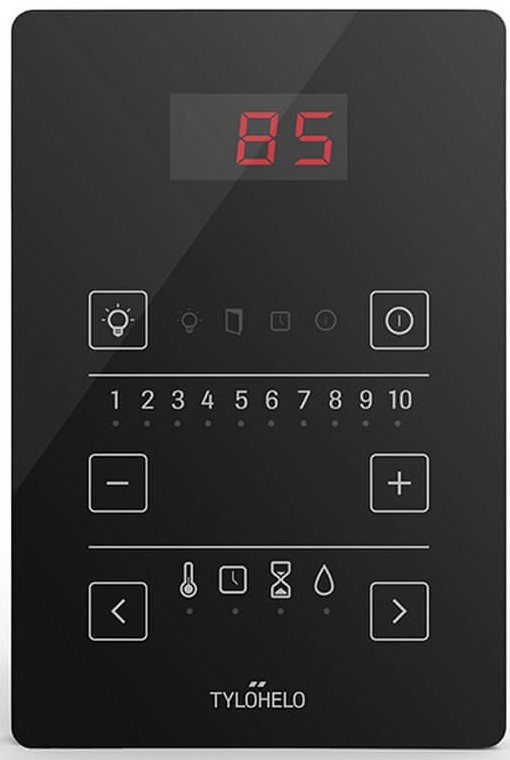
Low voltage separate control with light diodes.
Separate steaming reservoir. Low voltage separate control.
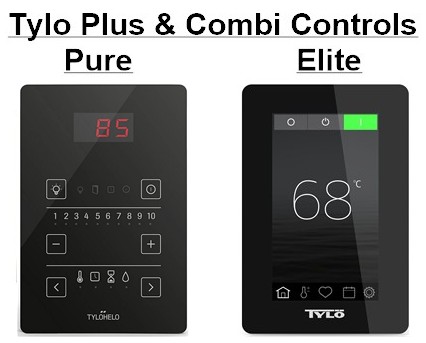
 Touch pad &WiFi
Tylö Swedish sauna heaters are widely renowned and greatly respected for their high quality and distinct features. See below to learn more about the Tylö design features and benefits.
"Thermosafe" velvety covering ensures a low surface temperature - just 40°C on the front and sides of the heater.
Twin side chambers maximize the through-flow of air, minimize heat-up time and economize on running costs.
No other sauna heater uses less energy.
Test after test confirms that Tylö is the most energy-efficient sauna heater.
A divided output is the secret behind the constant bathing temperature and lower energy consumption of a Tylö heater. Divided output means the heaters elements cycle in stages. Other heaters go on/off, on/off, etc. causing a temperature swing. Tylo heaters maintain an overall higher and more consistent temperature.
Only Tylö has a solid-cast top, inner casing and stainless steel stone compartment.
Tylö is the only sauna manufacturer to produce its own heating elements - the very heart of every heater. High quality here is crucial for a long service life, and Tylö elements are widely regarded as unsurpassed.

A deep generously proportioned stone compartment, and direct contact between the stones and the heating elements ensure perfect water sprinkling with 100% vaporization.
Tylö makes sure that the quantity of stones is perfectly matched to the output. Too many stones prolong heating-up times, leading to higher energy consumption and poorer steam generating performance. Tylö heaters are also the only ones on the market that can be used with or without stones.

This unique Tylö feature further enhances your sauna bathing experiences.
With a Tylö heater, you can enjoy a pleasant sauna, wet or dry, at whatever temperature you choose from 40-90°C (104-194°F).
Time and time again Tylö has scored top marks in Finnish sauna tests. Tylö was first awarded the coveted 'Best in Test' accolade in competition with seven Finnish heaters in 1982. A test published in a Finnish magazine (Kuluttaja no. 5, 1995) confirmed that Tylö also has the quickest heating-up time and lowest energy consumption. A SEMKO test in April 1999 confirmed this result and also proved that the steam generating performance of Tylö heaters was unrivaled.
Click for more info: Tylo Combi Steaming Sauna Heater Brochure
The Tylo Sense Combi is quite simply the most sophisticated sauna heater on the market - the only heater that lets you enjoy traditional or Soft Sauna in one and the same room. The choice is yours. We call it Soft Sauna.
A gentle way to share a pleasurable experience. It is just as much a way of life as it is a technical sensation, and yet it takes up just a few square meters of space in your home. Invite your friends and family, select a therapeutic essential oil, feel the warmth and gentle. Steam engulf you, and enjoy being together. Let Soft Sauna make an impression on your day.

Soft Sauna picks up where traditional saunas leave off. Some people prefer a hot and quick sauna, others like to linger in mild temperatures, enjoying the gentle steam and aromatic fragrances. Test for yourself which temperatures and options are ideal for you and your relaxing moment.
Imagine having a family home spa with the resources of a professional spa where you can relax together, exquisitely engulfed in steam and aromatic scents – and yet also be able to enjoy the relaxing dry heat of a traditional sauna. Choose the sauna cubicle and heater that suits you and the way you want your moment to be. A moment that stretches on and beyond.

The Combi is like having two saunas in one. In dry mode, it operates like a typical sauna - high heat, low humidity. In "soft sauna" or steam-sauna mode, it is an entirely different sensation. When you splash water on the rocks, you to get that blast of heat. Many of those who enjoy saunas love that sensation. Others find it a bit too intense. When you slow boil the water, you soften the heat. It takes the edge off. The Combi broadens the appeal of saunas. Those who have historically not like saunas really enjoy it. And old fashioned sauna enthusiast love it even more. You can still splash water on the rocks in steam mode to get that wave of extra heat. The Sense Combi is a true hybrid. Two distinct sauna experiences in one and the same room.
The Combi produces steam and the sauna is more humid that a typical sauna, but it does not generate steambath levels of steam. It is not a Turkish bath. You will see steam rising off the heater and you will feel the difference, but the walls do not get wet. And once the Combi has completed its steam cycle, the sauna portion comes on high for 20 minutes to help bake the room dry.
Click for more info: Tylo Combi Steaming Sauna Heater Brochure
Please note that SaunaFin will be closed effective 12pm on December 24th until January 4th. Normal Business Hours will resume on January 5th at 8:30am. Responses will be delayed, but we still look forward to hearing from you.
Please, enter a valid value


(1).jpg "clear cedar sauna wood")
.jpg)